Friday, 31 August 2012

Breach (Blog Week post5)

Me and my wife have both been admiring the models & aesthetic of Malifaux for quite some time, and I decided to take the plunge and buy us a 'crew' each at some point this year. The updated rulebook including fluff is winging it's way through the post to me as I type this.

Whilst not really being much of a gamer, my wife and I have played Mordheim in the past, and she is part of my current D&D group. We also play Magic The Gathering together occasionally (as well as the ubiquitous Munchkin) so it'll be good to get something new to play.

I've pretty much settled on the Lady Justice Crew as my choice. I like the models (though I think I prefer the alternate Lady justice sculpt). The judge and the marshals are amazing models, and I like what I've read about their role in the guild/Malifaux etc.
If it weren't for the gen con pre-releases I would still be happy with my choice, but some of the new plastics coming out for the game look fantastic. I'm not sure when these go on general release thouygh, so I'll stick to my guns for now :)

Rasputina stuck out for my wife, and I have to admit this is pretty cool starter set. I've had my eye on the ice golem guy for a while for use in DND.  

After checking out the fan/tactics wiki it seems that this pair make a good match up, so learning the game should be pretty straightforward.
One thing that I'm really looking forward to though is the card mechanic.  The game doesn't use a single dice, instead using a stylised version of a playing card deck (apparently normal cards can be used with ease if the suits are replaced with the ones used in game).

As I said, the rule/fluff book is in the post, and I look forward to reading up on everything and taking the plunge into the game when I get the models ordered :) 

Just a reminder that tomorrow's post is the penultimate blog week entry, with Sunday's dealing with the give-away I had planned.

Thanks for stopping by
Lofty


Thursday, 30 August 2012

Airbrushing: Paint review (Blog Week post4)

I picked up the last of my orders of paint yesterday from the post office, and rushed home eager to try it all out.  I'll start off by saying that (funnily enough) for airbrushing, Vallejo Model Air paints are an absolute dream.

So amongst the new paints etc I ordered, I decided to pick up some Vallejo thinner, and grabbed some of their cleaner whilst I was at it (damn you Amazon).  I'm very glad that I did.  I mentioned in my initial airbrush post that Windowlene is a good medium to thin paints with, and to clean the brush between colours.  For a beginner though, the branded thinner is fantastic, comes in a dropper bottle so it's easy to add to the mix, doesn't need to be pre-mixed with water and is ultimately made to be used with Vallejo paints so it naturally works well with their formula.

I decided to test things out on some bases I've made recently, so I fired up the compressor and loaded by brush with the Vallejo grey primer I picked up when I first purchased my gear.  This is actually the only stage I had trouble with last night, I couldn't manage to get the primer to flow well at all, it was thick, and seemed to be coming out onto the paper very clumpy. I added thinner, and even a little of the cleaner which I had read might help.  I was ready to dissassemble the airbrush to find out what was wrong with it (in a sulk I might add) as I think I may have altered some of the needle screws which control how the needle and trigger interract before realising a i don't have a clue which way of a screw turhn adjusts what... I happened onto a YouTube video where the painter thins the primer pretty heavily (10:1) so I decided that my heavy handedness/eagerness was to blame and washed out the primer.  I decided to try out one of the VMA paints to see if I had any more luck before blaming the hardware (a poor workman, right?).  German Grey steps up to the plate, couple of drops of thinner stirred in with a wet brush (saturated with water) and knocks it out of the park.

Fantastic coverage
Fantastic consistency
Awesome colour/tone

I can't begin to describe how impressed I was with the VMA paints to be honest, it made using the brush as easy as it appears in some of the YouTube channels I watch.  I decided to bust out a second colour to make sure the grey wasn't a fluke, and it certainly wasn't. I don't remember the name of the brown colour, but it was just as much of a joy to use.
There wasn't much time to thin down any regular paints I've purchased from the VGC range, but I did have a quick fuss with them on my trusty elf spearman-colour-test-guy, and they're great. Good coverage, good pigmentation etc

Conclusion
I definitely learned some valuable lessons in my short airbrush session yesterday;

- Thin paints, multiple layers. As the paint dries so quickly, it's really no hardship to add multiple layers of paint to the model, and the amount of frustration saved with thinner paints (better trigger response, less chance of clogging) is massive.

- Time. I'm beginning to think that airbrushing would be better suited to the weekends.  This isn't because it's an overly arduous set-up/pack-up process, rather because by the time I'm back from work/work&gym, helped to prepare/consume an evening meal, washed the dishes and helped with lunch for the next day it's not far from 21:00 so I would feel a lot happier taking more time at the weekend to use my airbrush, and not feel rushed/constrained with time.

- Practice. It will definitely take some practice on paper/test models (poor spearman) before I feel like I can apply something more than base coating to a model I would not want to ruin.  To be honest though, this works out great for me at the moment - base coats on a few models at the weekend combined with a few hours practice with the airbrush leaves with me a load of base coated models to 'regular paint' in my short evenings during the week.

The more I use the brush, the more pleased I am that I took the plunge and bought the set-up.  It's definitely a steep learning curve, and not without it's frustrations, but in the end I'm sure it will be worthwhile.

Thanks for stopping by
Lofty

Wednesday, 29 August 2012

De-baser (Blog Week post3)


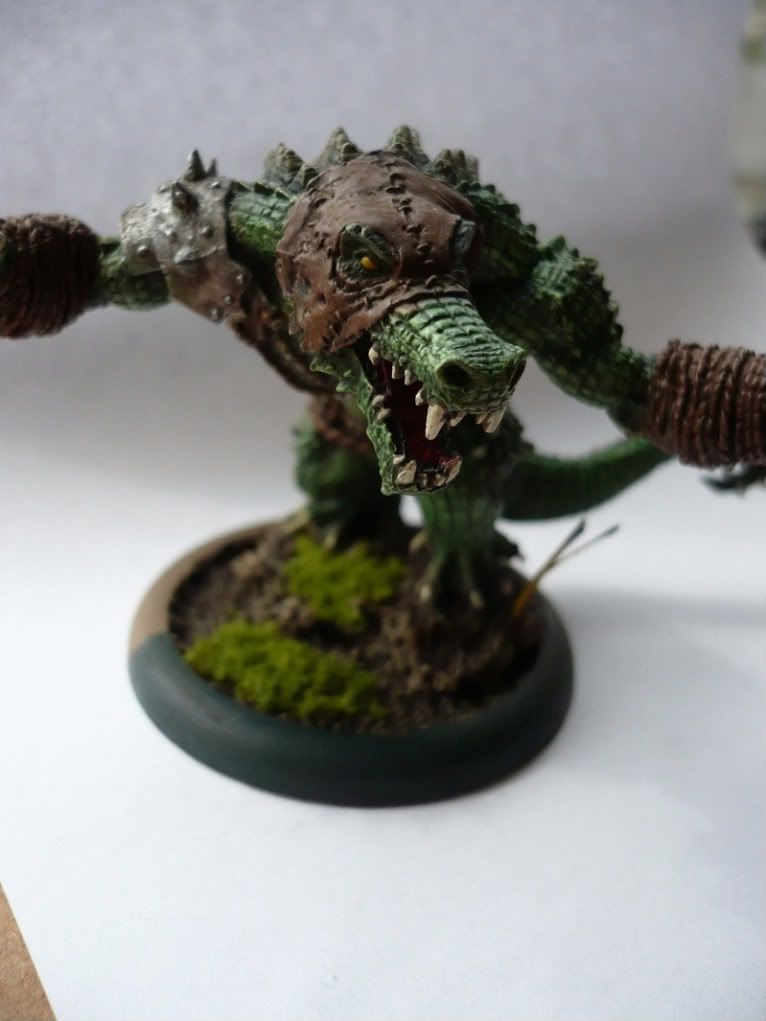
When I saw that the minions book was coming out, I was very keen on picking up the Blindwater congregation, and was very inspired by the work some people had done on the forums with "hollow" bases used to create a water effect in a swamp environment.

My first attempt at creating my own version of this base went pretty well;
(water effects haven't set yet in below pic don't worry :))


But with the tools/materials I had at that time, I really couldn't foresee my self recreating this base for all the Gators I would be using in the force.

A few google/ebay searches later I found a british webstore selling hollowed out resin bases in privateer press size/style bases, happy days.

Skip forward a year or so, and I've used a fair few of these new resin bases to make my gators look rather spiffy.


(yes I know the water effects is still missing, it's on it's way I promise).

What's the point of all this you may ask? Why am I even telling you this seemingly anectodatal tale? Well dear readers, all is not as it seems. As you are aware I recently purchased myself some tourney trays, which was something I've been wanting a while after a few tournaments involving table hopping etc. As I begin to put models in the trays to test & photograph, it became glaringly apparent that the resin bases are larger (by a reasonable margin) than standard privateer bases.

Besides being pretty miffed that my Blindwater guys won't fit into the tourny trays, I was also miffed that the bases sold to me as 40mm/50mm bases were actually more like 42mm/52mm. This made me feel ridiculously guilty before realising that I'd never used the Gators in a tournament, but nonetheless, the bases are wrong.

I'm not going to name the webstore I got the bases from, but I will just leave you guys with this cautionary tale, and a piece of advice: if you are ordering resin bases as replacements for standards, it might be worth checking them 'back to back' with an official base, as they may need sending back to where you bought them :)

Finally we come to the point of this post, which is basically that I'll be re-basing a few of my minion models onto Privateer bases which I have modded to allow for depth & water effects.

It just so happens that I photographed the last two bases I made for my newly purchased Destors, so without anymore rambling, I humbly present;

Lofty's Water Base Tutorial 

There are two types of bases that I usually make, the fully sunken base, and the sunken ledge. This tutorial will cover the sunken ledge, but it is more than simple to apply this methodology to the entire base.

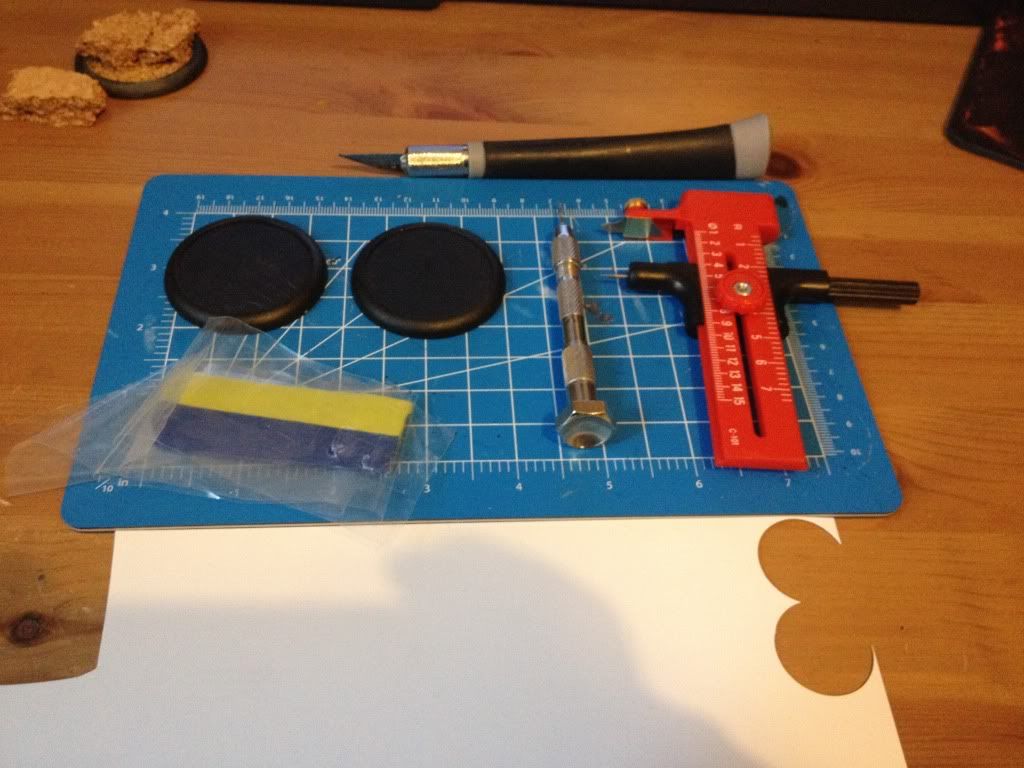
The tools I use are shown below, and consist of;
Hobby Knife
Clippers
Circle Cutter
Plasticard
Green Stuff
Pin vice drill (I use a 2mm bit for this process)


Step 1:
Use the circle cutters to cut a circle of plasticard with a diameter which will allow it to fit inside the underneath of the base.  This should be as snug a fit as possible, but if it isn't exact, it wont matter as you will see in later steps

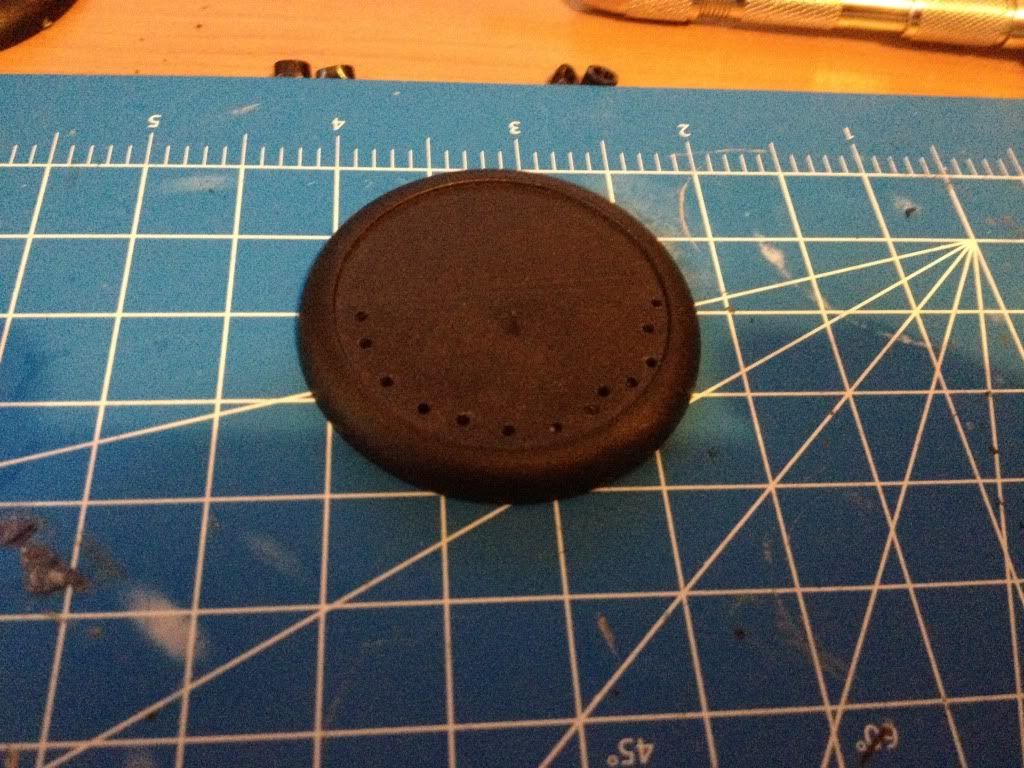
Step 2:
Begin by taking your base of choice (I've only made these bases from medium and large bases, but I'm sure it would work with a small base, albeit with more fiddling) and drill holes around the edge, keep them as close together as possible.


Step 3:
Using either clippers or a hoby knife, connect these holes together and remove the resultant area of plastic.  This will give you a rough hole in the base.  This could look good in some circumstances withj a water effect, perhaps as some kind of pothole or some such, but I prefer to have a clean edge to the base in order to pad out later with cork/gravel.
Depending on what you would prefer, you will need to run your hobby knife around the edge to remove the excess plastic, and maybe even a file to get a smooth edge.

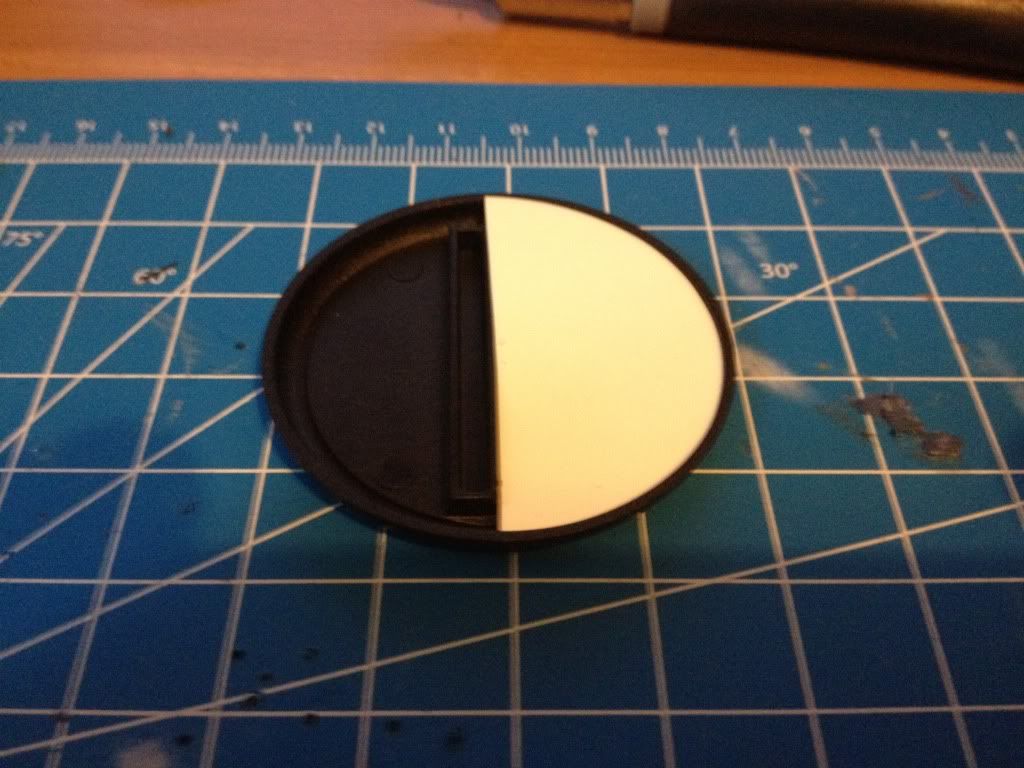
Step 4:
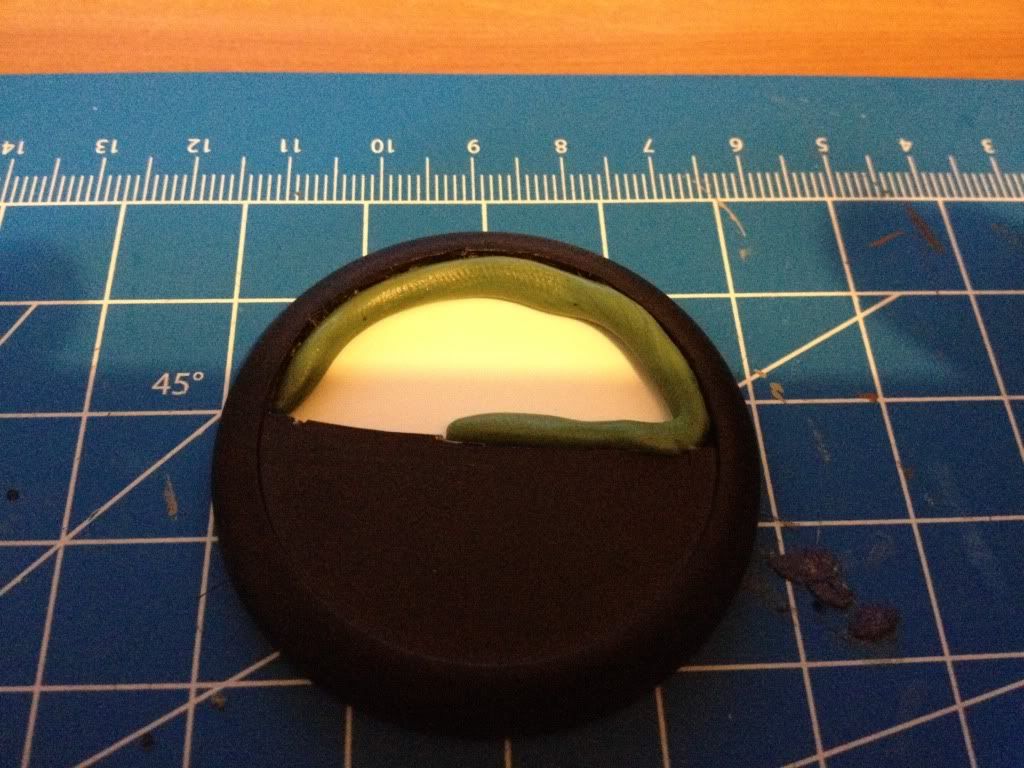
For a sunken ledge base, cut the plasticard so that the curved edge is flush with the inside front of the base underneath, and the cut edge is flush with the centre tab underneath the base. For a fully sunken base, simply ensure that the circle of plasticard is flush inside the base underneath.


I don't use any glue to secure the plasticard, as I find this to be more fiddle than it is worth, and I have to use 
greenstuff to seal the join anyway, so I use greenstuff as the adhesive as well.

Roll a length of GS and push this into the areas where the base joins the plasticard, and using a sculpting tool, pad this in, and smooth it of as best as possible.


Step 4:
This stage is essentially dressing the base to look how you want it to look. I add slabs of cork on the raised part of the base, and gravel/sand in the lower part. I occasionally leave the gravel off to create the illusion of deeper water, and with the fully sunken bases, I use thinner slabs of cork, if only to give the model something to be glued/pinned onto.
Something I usually try to do though is to mask the join between raised area and the sunken area.  I do this my using small pieces of cork up against the join area to simulate the effect of a river bank or simillar instead of a just the sheer drop which would be there otherwise.

Here's an example of one base I've made towards my Destors unit using the sunken ledge method


Hopefully this has been useful, there are a number of YouTube videos covering this type of base, with a few variations on my methodology.  This has worked great for me in the past though and I'm pleased with the look it gives in the end.
I've a fair few bases ahead of me to make to replace the ones I've used on my Blindwater congregation, but once hey're all made, I can get to painting them, which is the part I'm looking forward to with all the new airbrush paints I've got coming :)
Let me know what you think, or if there are any parts which need clarification etc. I'd love to see the results of anyone trying this method for themselves

Thanks for stopping by
Lofty

Tuesday, 28 August 2012

Airbrushing: Setup (Blog Week post2)

A previous comment enquired about the size of the entire rig, presumably with a view as to how it would affect existing workstations.

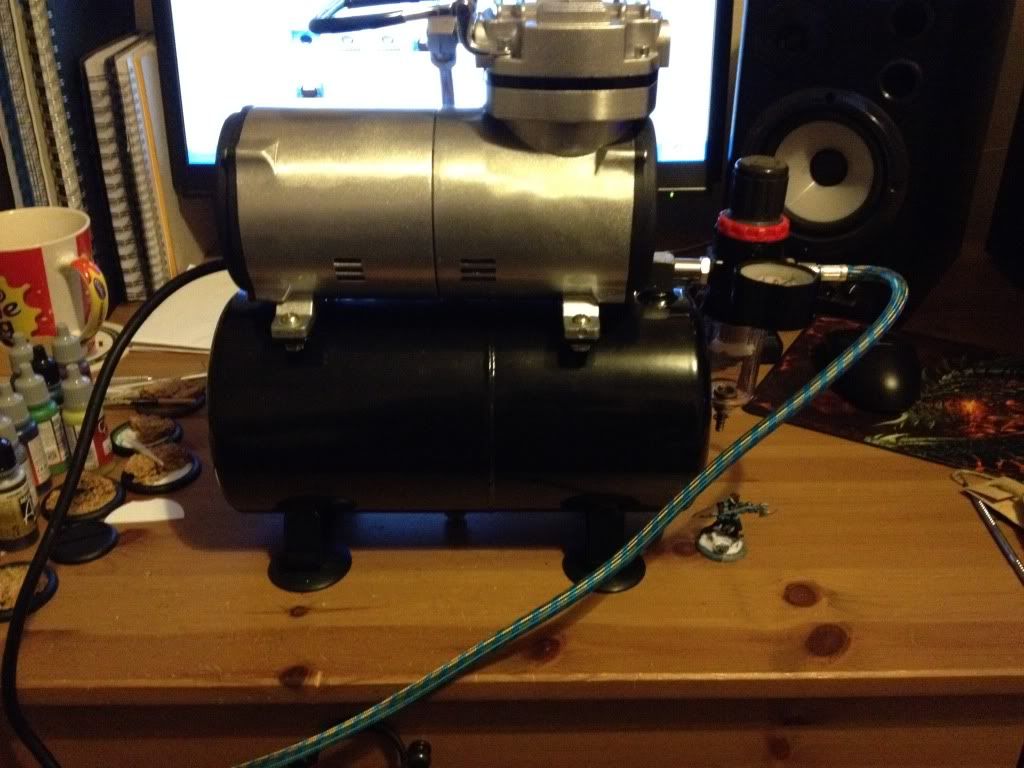
The short answer is that it fits in really well with my current set-up. The compressor goes to the left of my chair, in front of the left side of my desk, and near the window in our study room.

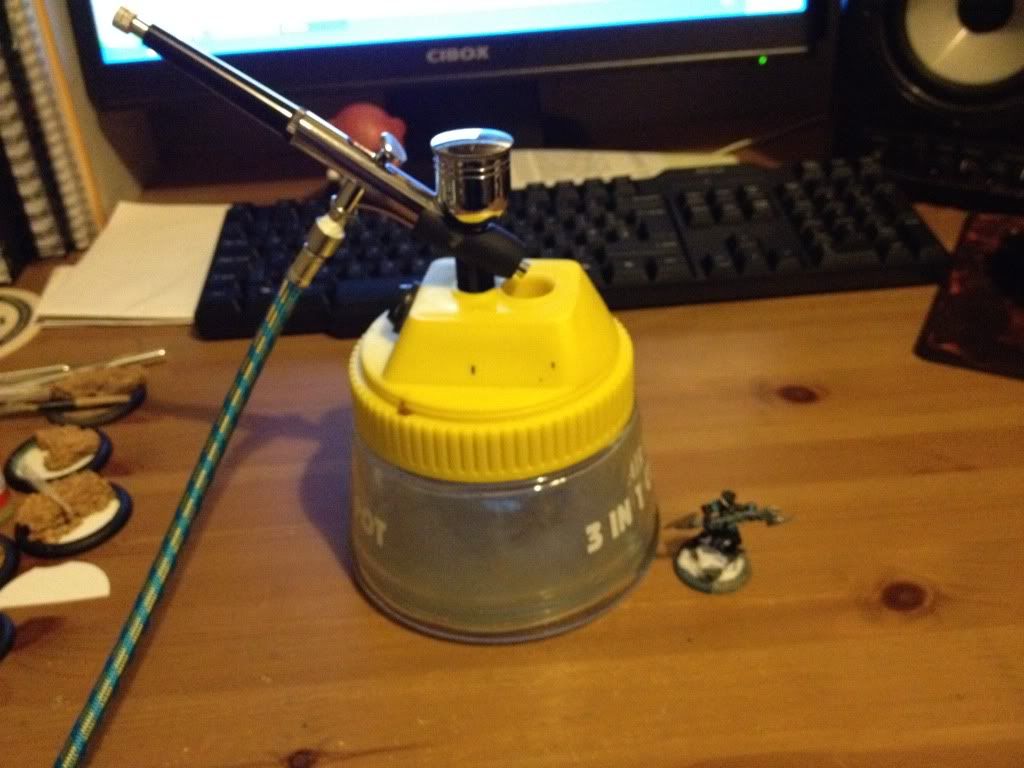
The brush rests in the cleaning pot just in front of my left desk speaker when not in use. Neither item takes up a great deal of room, or causes any great fuss to move around.

The pictures below should help to put this all into context. The lovely Ravyn appears in the photos to provide perspective to the items.


My desk is pretty chaotic at the best of times so it's great that all I need to do is shift the airbrush holder around to be accessible.

I'd like to cover the process of painting with/general use of the airbrush in future posts so I won't go into that a great deal at the moment, but I currently use an old magazine/newspaper to spray down onto, as well as a sheet of plain white paper propped in front of my monitor/over my keyboard to protect from any stray colour.

I'm off to the post office tomorrow to collect what I hope to be the rest of my paints & the thinner/airbrush cleaner that I ordered, so I can blog about the process end to end, maybe including cleaning time permitting later this week.

I hope all this is still useful

Thanks for stopping by
Lofty
Monday, 27 August 2012

Tray cool (Blog Week post1)

For the longest time, I forgot about my one time obsession with "witty" post titles and word play. Back to it I guess!

In a previous entry, I mentioned that I had ordered a tourney tray from a website I had spotted on the PP Forums. The original post was closed due to commercial product links, however I think this is drastically unfair, as other manufacturers posting there can post product links with impunity.

Anyhow, I was inspired by what I saw, and emailed the company in question immediately.  This is due to the fact that the original trays were done at special request by the poster on the PP forums, and at present no plans for anything other than special request production are in place. Ten days later (after a national holiday for them, and a weekend trip to the post depot for me) I had my grubby mitts on my parcel all the way from Lithuania.

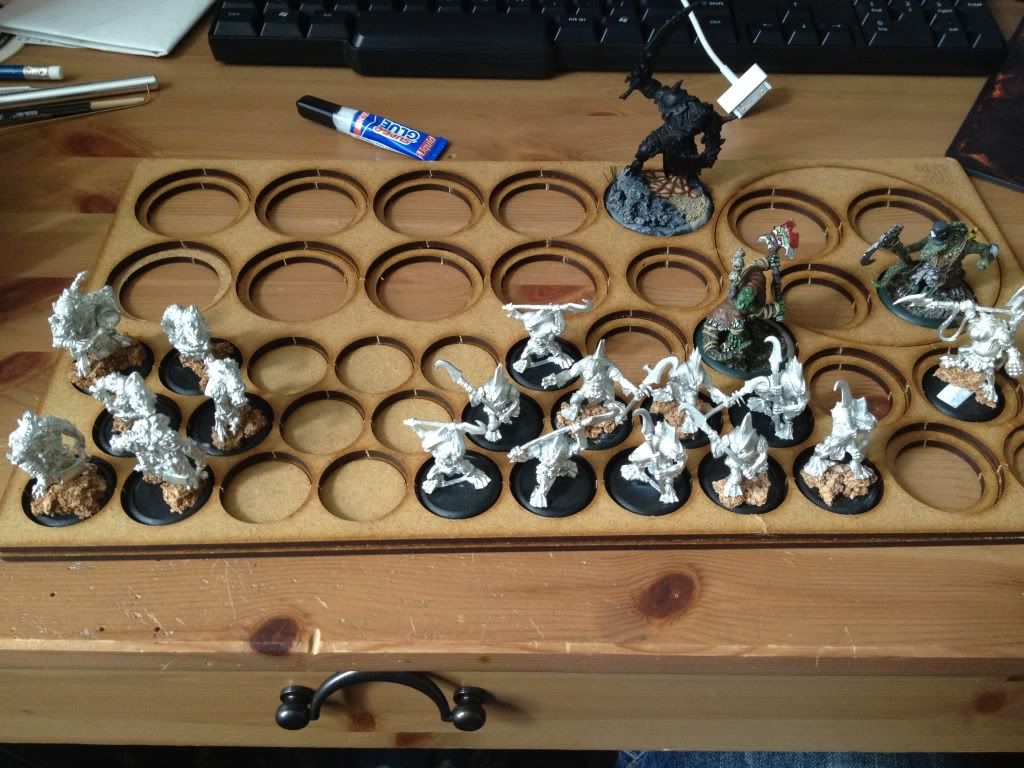
My initial reaction was to be supremely gutted, as the postal service had decided to stand on the parcel and nearly snap both boards in the process... Fear not though intrepid readers! Part of the plan is to utilise both trays as one in order to get the most out of available model slots. Confused? Allow me to illustrate more clearly.

The tray as it was unpacked (note the damage on the front near the right hand side)


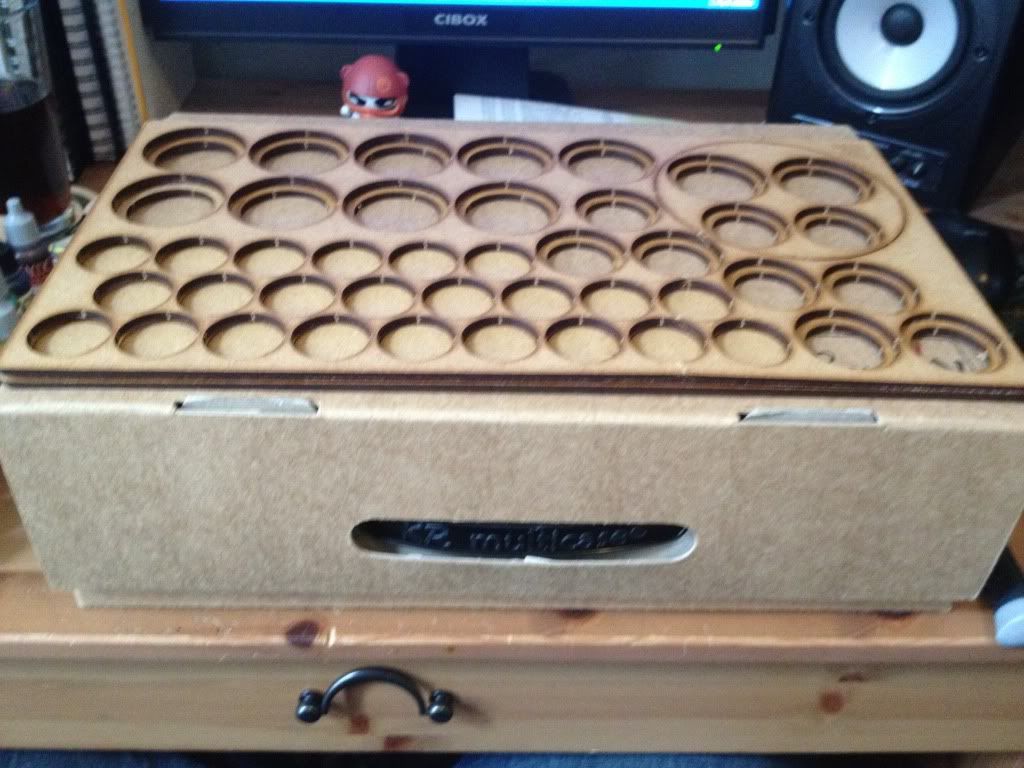
This is as the tray is supplied, pick and pluck almost for model placement.  The second tray is an identical layout, and as I removed the circles from the top layer to accommodate the largest base option, in the layer below, I removed one size smaller.  By which I mean in one space, I could have a heavy(or medium) base or a medium(or small) base with the smaller base size simply sitting on the lower layer. See below for clarification. The largest circle in the top right is removable to allow a Colossal/Battle Engine to be placed as well if I ever go crazy enough to buy one :p


And here we can see a few blindwater congregates chillin' along side Molik Karn who is standing in for all my heavy beasts on resin bases (rant incoming on third party resin bases....)


And finally, a picture which puts the neat size of the entire product into perspective, chillin' on top of my KR Case


Conclusion
The conclusion is that I love these trays. Simple as that. Yes, it's a shame that the postal service doesn't give a flip about my parcel, but all is not lost.  The fact that I'm gluing the layers together, and then to a base of 3mm MDF will give the tray a lot of added strength, and overcome the structural weakness imposed so far.  All it takes (after asking the chap who bought them on the PP forums) is some wood glue, and I'll sand the smooth surface off the contact areas of the two layers/base to ensure a good stick.

All in all, these are budget trays. Given the choice I'd much rather order a different tray from a maker in the US, but after enquiring about shipping and being quoted 30GBP for the privilege, I'm very glad I found this alternative. With a minimum of work/fuss I've turned that shipping money into a perfectly serviceable tournament tray.

Please get in touch if you have any questions guys, as I really think this is a worthwhile investment, and I'll be recommending these trays to anyone that asks me about them when I take them along to tournaments

Blog Week 2012

There are plenty of things that I need to update the blog with at the moment, so instead of making back to back posts, and spam the IABN etc, I've decided to do a blog entry per day on various topics to get everything covered that I'd like to.

As well as this, I'm going to be spending time this week editing some tags on old posts to make the blog a bit more comprehensive and easier to navigate :)

I'd love to do some kind of give away at the end of this week, as The blog is also coming up to the 3year mark but I'm really not sure if there's enough interest/readers to make this interesting.

If it were to work, I'd have a post at the end of the week, and draw a name from comments on that post to win a base made and painted to requirements by me and sent out. I'd love to be able to do that so let's hope this works out!

I'll be making my first blog week post later on today, so until thank,
thanks for stopping by :)
Lofty

Tuesday, 21 August 2012

Airbrushing: Brush review

As promised, here is the next instalment on my gear write up for a basic airbrushing setup.

As I've mentioned before, I did a lot of leg work before deciding finally on what I purchased.  My brush (BD130k), I decided was the one for me for a couple of reasons.  After watching a video from a youtube channel which I'm an avid fan of - BuyPainted- I picked the basic model described in the video. Mainly as I knew I wasn't going to be outputting pro-painted miniatures straight away, and decided it was best to learn with a basic brush, and upgrade later if I decided I was going to stick with airbrushing.  The real deal closer on this brush however, is the spare parts.  It comes with three needle/nozzle combinations, which I thought for the price, and for a starter was really great to be able to have the choice/adaptability whilst learning.  It also comes with an air hose, which some brushes don't leaving unsuspecting hobbyists needing to make another order for the kit to be usable.

The only real issue I've experienced so far is minor, so I won't break down different aspects of the brush as I did with the compressor.  When disassembling the brush for a first clean, I was a little too thorough, and removed part of the trigger guide which is exceptionally tricky to get back in.  This is all shown in the hardware diagram which comes with the brush, so it was easy to find out where it when, but my big hands versus the small piece in it's small location made for a bit of a nightmare!

As I said above, I've really not had many issues at all with the brush, it's a solid piece of hardware, so instead, I'll go through some essentials associated with the brush specifically.

Cleaning - There are two aspects to this, the first of which is cleaning the reservoir between paints.  This involves simply pouring out any excess paint into the cleaning pot, and cranking the psi to around 50 to blow through one cupful of clean water, and at least one cupful of windowlene, using an old brush to remove any dried paint as necessary.
The second aspect is a full clean.  In order to do this after a session, I run through the steps above, and unscrew the back of the brush, as well as the needle holder (sorry I'm not sure what it's called, but it controls how far the needle moves when the lever is pulled back) and pulling the needle out.
Be careful doing this, as the point of the needle is of course very fine, an d any bends/damage can render it useless.  I use methylated spirits to wipe any dried paint etc off the needle, as well as off the outside of the airbrush where I've spilled anything.  The nozzle also needs to be treated in this way in order to help prevent blockages.
After removing the nozzle, I run pipe cleaners through the front of the brush so that they appear in the reservoir area in order to remove any solid bits of paint.
That's pretty much it, it's a simple process and is relatively quick to do at the end of a session.  The lengthiest part is probably blowing water/windowlene into the cleaning pot

Blockages - These are unfortunately relatively common from what I have read as well as being unavoidable.
During my first session, I was hitting stages where I would have to pull pretty far back on the paint lever in order to get any paint flow at all.  Usually you would see a steady gradient of paint flow as you pull back on the nozzle.  If this happens like it did to me, it's likely that you have a blockage.  Whilst irritating, and time consuming, the process to fix this is simply the first stage of cleaning, combined with the pipe cleaner through the nozzle trick.  The really frustrating thing is when you have a specific mix of paint which you are using, as it has to be tipped out to clean the brush.

Thinning - I read in a few places that Windex (Windowlene in the UK) is fine for diluting paints to airbrush.  Whilst I've found this to be true, I have ordered a Vallejo thinner to do it "properly". The main reason for this is that the thinner is made to be used roughly 50:50 with the paint, where as windowlene works best 50:50 with water, and then added to paint as needed, I've had to add nearly 75:25 with paint previously so result vary wildly depending on paint quality (as I've previously mentioned).
In short, Windowlene is absolutely fine to use, and has been recommended by a few pros (on youtube) but it depends how much work you want to put into using it. It's also a good substitute to clean the brush with instead of buying airbrush cleaner.

PSI - This is a bit of a tricky one I've found, and I'm still not100% sure what I'm doing with it.  The basics however, are that the thinner the line/the closer you want to get to the miniature, the lower the psi you will need to use (around 10-15 is what I've found to be good for 'detail'). For base coating & holding the brush a fair distance away for large areas of colour, increase the psi to around 30-40.  I hate to be a cop out here, but there are some really great youtube videos which cover this kind of thing, where I wouldn't really be able to provide a great deal more information.

PTFE Tape - I had a few worries when I first started brushing as the compressor would come one very quickly when I wasn't even using the brush.  After speaking to the shop, they recommended my applying PTFE tape to the joins at either side of the air hose.  Doing so was simple, and googling simply 'PTFE' brings up a very good tutorial video on how to apply to joins.  The compressor stays on for a heck of a lot longer before kicking in now, all at the low cost of around £1.50 (inc delivery) for the tape, and ten minutes tops to fit it.

I'm very please with my choice of brush, and I think it's a fantastic choice for a beginner, or if you just want to test out if you want to continue with airbrushing.  If you get good results & want to upgrade then I'm sure you will notice the difference with a branded brush, but for someone with my level of skills & experience this one is great.

Thanks for stopping by
Lofty